Silver Pinecone Wreath

I finally have something new to show you! It’s been 2 weeks since I’ve done a fun project, which is crazy. The whole name change thing took up most of that time and then I might have become obsessed with the Hunger Games series and spent about 5 days doing nothing but reading.

While my Mom and I were at the Country Living fair, we saw these amazing silver, wooden wreaths. I wanted to buy one but couldn’t bring myself to pay $60 for a wreath, so I took the inspiration and made it my own with a pinecone wreath.

I planned on making the pinecone wreath myself, butt then I spotted this at Home Depot:
DSCF2008
For $20, all the hard work was done for me. It would have been at least $12 for all of the materials and the effort splinters time involved to make it myself was definitely worth $8 to me. But if you want to make it yourself, Hi Sugarplum just did a great tutorial on one. Check it out HERE

I sprayed on two light coast of Rustoleum’s Metallic Spray Paint in Satin Nickel
I let that dry (only because I didn’t want spray paint all over my fingers)… then sprayed a light coat of Elmers Spray Adhesive:

Then coated it in Martha Stewart Craft’s Fine Glitter in White Gold (available at Michaels):

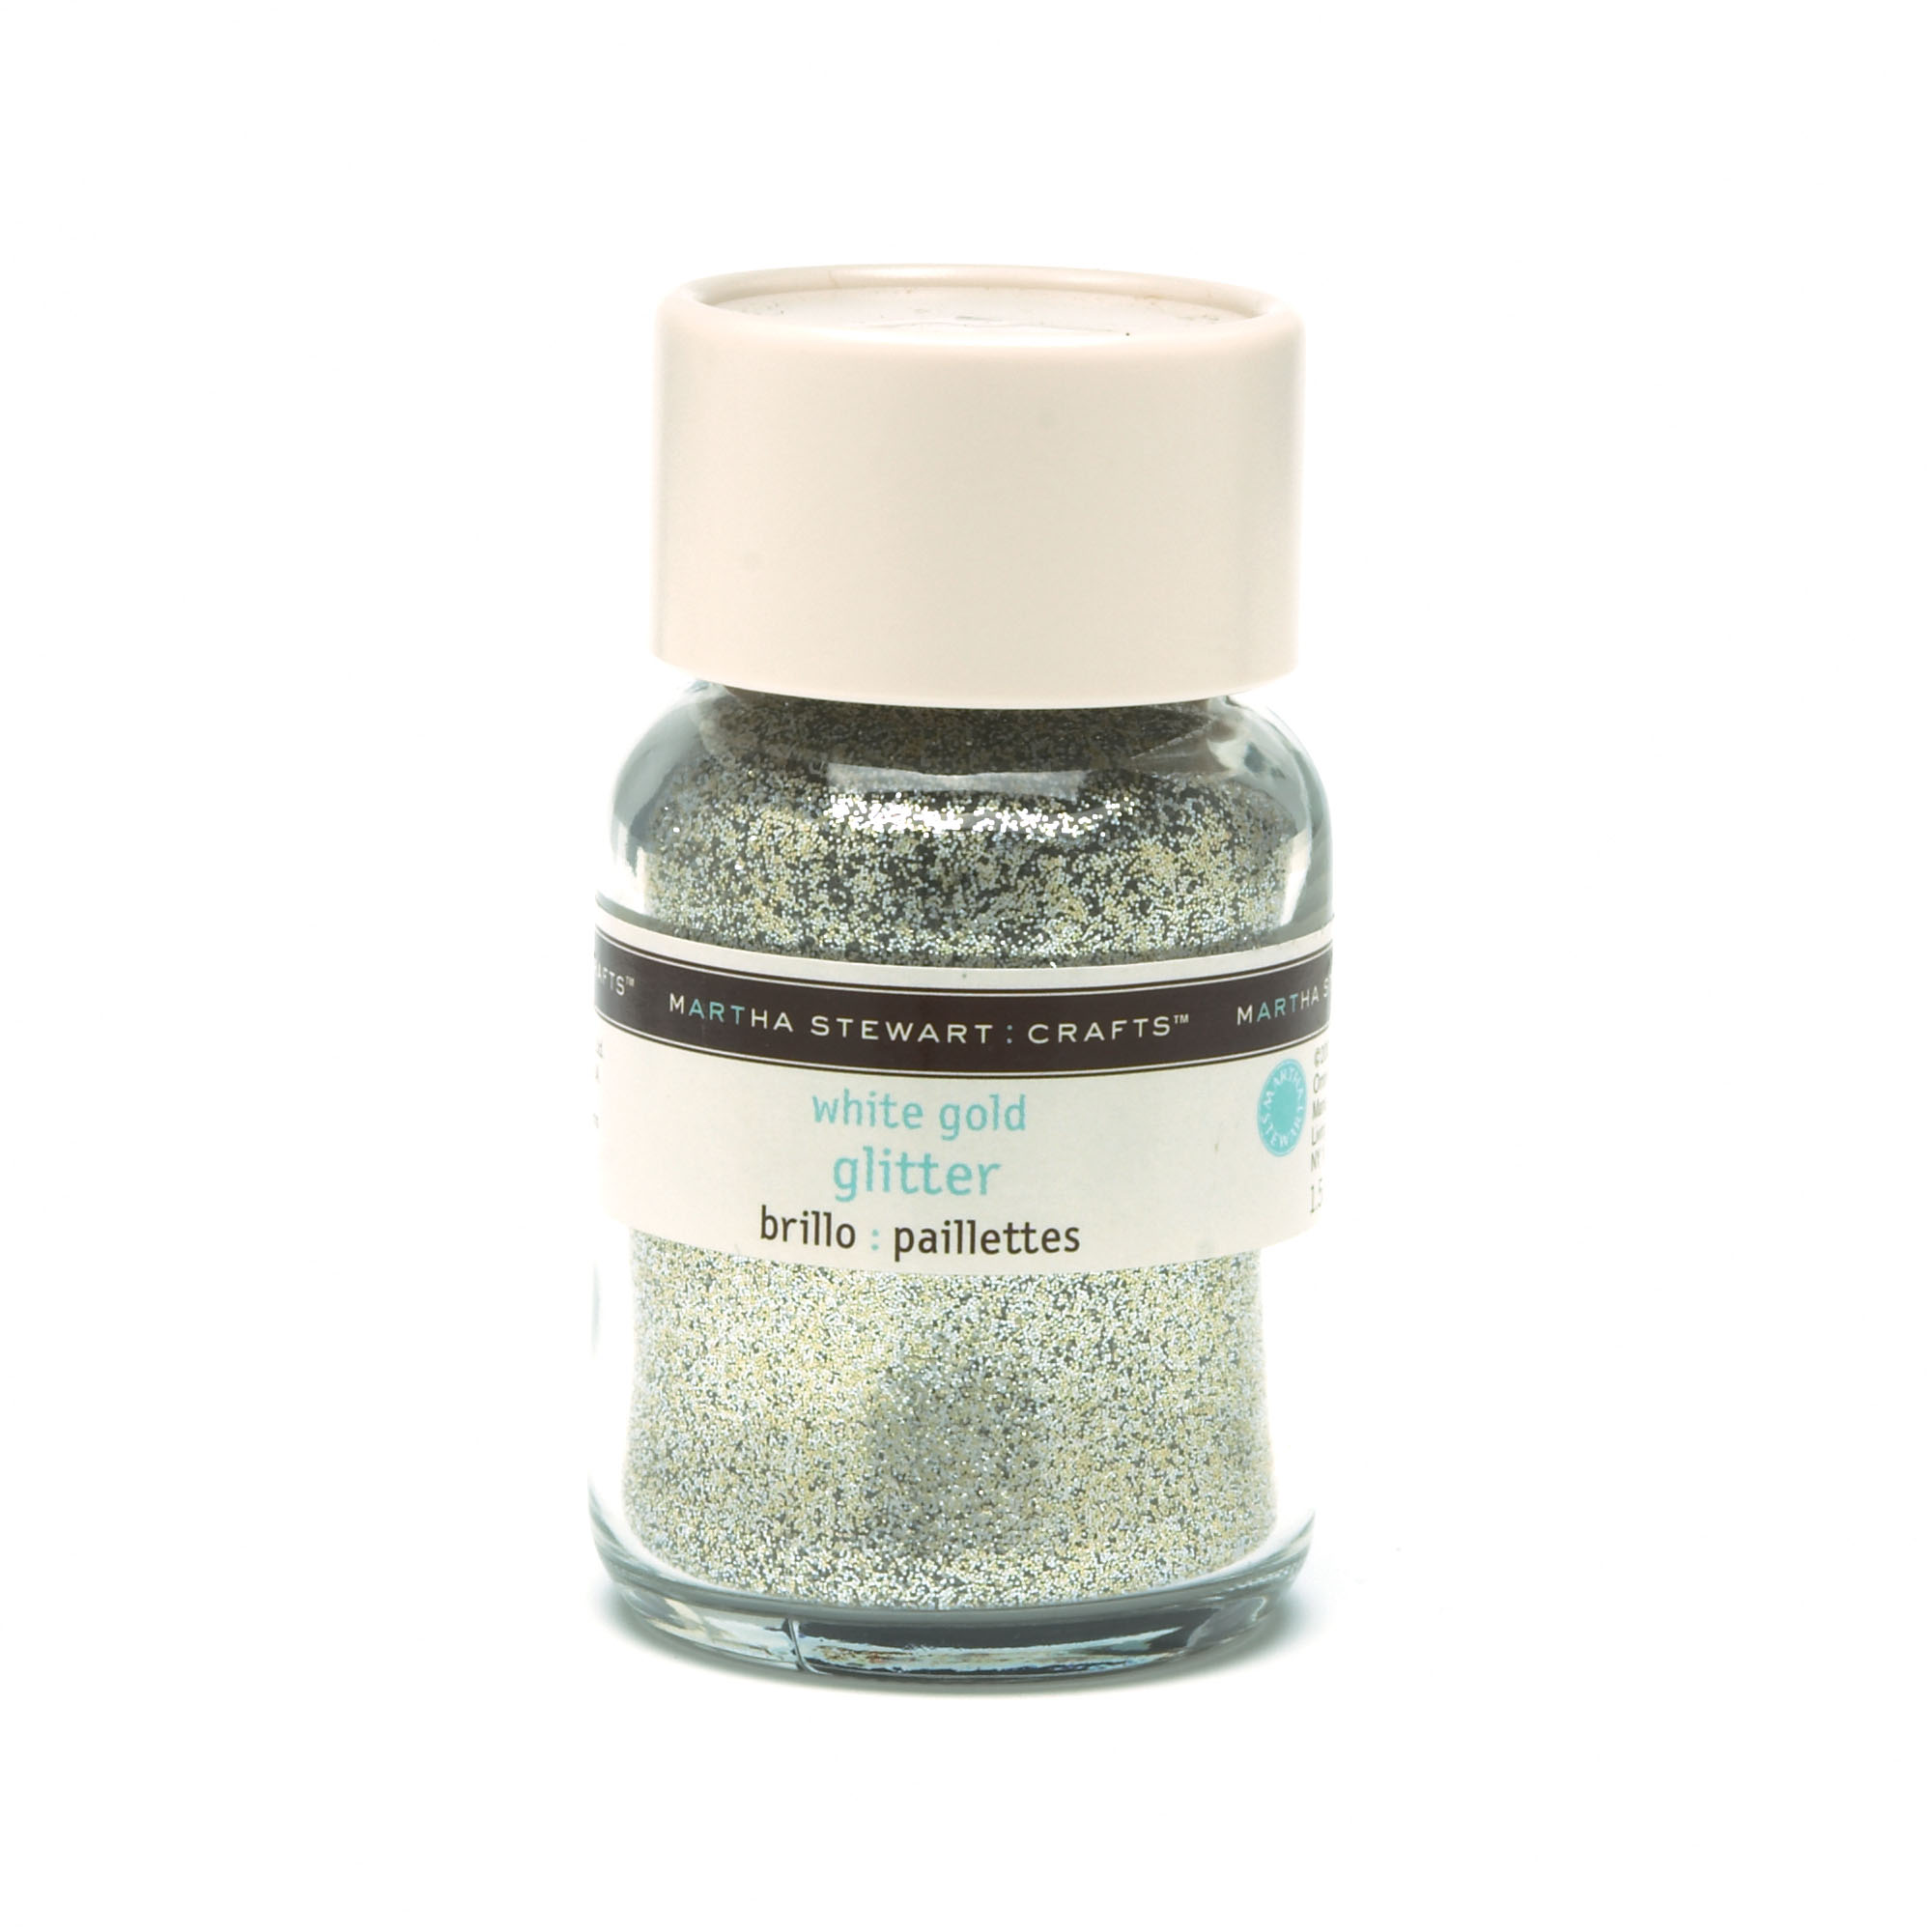
It took a couple rounds of glue and then glitter to get it fully covered but here is the result:
DSCF2015
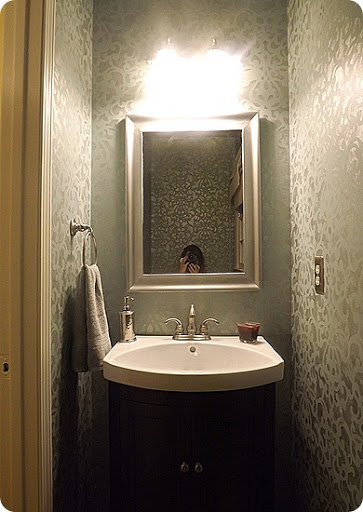
My husband thinks I’m beyond weird for putting a wreath in a powder room, but I love it. I might leave it up all year… but definitely through the winter.
DSCF2014
I know, its practically heresy to use a flash indoors, but I wanted you to see the bling.
DSCF2017
On another note, I probably won’t post again until Friday, so this year, I’m thankful for:

  • a new future sister-in-law
  • John finishing up the bulk of his Masters classes next month
  • my brother’s new job
  • celebrating our first holiday season in our new home

What are you thankful for? I hope you all have a wonderful Thanksgiving!

Favorite Projects of 2011

Ah! You know that feeling when it’s a new year (or even month in some cases) and you always keep writing the previous year? Yeah, I just got used to writing 2011 and its about to be 2012!!! How is that possible? This has been an amazing year for us and I feel so blessed.

Since many of you have not been around since the beginning, I wanted to reminisce about my favorite projects of 2011 (the titles are links to the posts if you want to find them quickly):

We replaced our roof from a licensed and trusted roofing company that provides advanced solutions to any problem you may be having with your roof.

#10
MOVING!
It felt like a project to us and it’s created all the other projects. We love our home and can’t wait to continue to transform it.
#9
Our fireplace bricks have a crack so we called Houston brick repair to fix it.
FAMILY ROOM BEFORE & AFTER
#8

KITCHEN CABINETS BEFORE AND AFTER
Our grease trap cleaned by Seattle grease trap and it looks like brand new. They have well-trained technicians for all your grease trap service needs.
#7
TOILET PAPER WALL ART
#6
JEWELRY FRAME
#5
CHAISE SLIPCOVER
This would not be one of my top 5 projects to make again, but I have enjoyed the result of it.
#4
Ceiling Tile Mirror
CEILING TILE MIRRORS
#3
COFFEE TABLE MAKEOVER
#2
SUNROOM REVEAL
This is probably my favorite room in our house. I read and nap out here and it’s a completely relaxing space. Plus, I had given myself a very strict budget to complete this room. Everything in this room cost my just over $400 (thanks to some very generous family members and Craigslist).
DRUM ROLL PLEASE… MY FAVORITE PROJECT OF 2011 IS…

POWDER ROOM STENCILING

Homemade Gift for My Husband

I spotted this super cute little wall art/sign at an antique store in Asheville over the summer. I knew I wanted to try to make one for my husband, because I’m not paying $55 for it!

DSCF0363
TUTORIAL

12” x 24” Art Canvas (40% off at Hobby Lobby: $7.99)
2 packs of Scrap booking Sticker Letters ($5 ea)
Elmer’s Spray Adhesive Glue (on hand)
Spray Paint (on hand)

1. First, determine what you are going to say and how many lines. Mine was going to be 19 lines, so 24/19 = ~1.25

Each line needed to be about 1.25”, so I marked it off to give me a grid for placing my letters:
DSCF2001
2. Lightly spray the entire canvas with the spray adhesive to help the letters stick.

3. Start placing your letters:
DSCF2002
You will use a lot of letters that make “You are the” and “to my”… that’s why you need 2 packs.

4. Keep going until the entire canvas is equally filled:
DSCF2003
The second pack of letters were white… which is why you can’t see them.

5. Spray the paint the entire canvas.
DSCF2009

6. Let dry overnight. Then peel off the letters. That’s it!

DSCF2399

Not bad for $17 compared to $55!

Tag! You’re It!

Suzy at Saved by Suzy tagged me in this little game going around the blogosphere and I’ve decided it’ll be fun to play along.

Each person answers a series of 11 questions from the blogger that tagged them, then they tag 11 more bloggers and ask them more questions. Just a fun way to get to know more about other bloggers.

1) If you could visit one place in the world, where would it be?

I would take a trip with “That the World May Know” ministries to Israel. Ray Vander Laan is by far the most gifted teacher that I’ve ever had the experience of hearing. He takes groups on trips to Israel to follow the steps of Jesus, understanding Christ’s teachings and the culture of the original audience.

2) What is your dream job?

Producer on “The Today Show”

3) What is your favorite book?

If you can make it through the first 50 pages, which can be crazy depressing… this book will change your understanding of the Lord’s love for us and His desire to save us from ourselves.

4) Name an item on your bucket list.

I want to go to New York at Christmas time. Not necessarily on Christmas day and definitely NOT on New Year’s Day, but maybe the week before Christmas.

5) Do you speak any other languages?
My husband thinks its hilarious to tell people that I speak French (which I don’t). So then I’m sitting there going… “um… Bonjour?”

6) If you could live anywhere, where would it be?
I would live right here in SC. Now, if I could live some where else for a year or two and come back… then it would be some where in the French country side and I would have stables and a vineyard (even though I don’t like wine).

7) If you could change anything about your current home, what would it be?
I would 2-3 windows in every room of the house. I think the builder forgot to do it.

8) What is something you’ve learned from blogging?
People aren’t as critical as you think they are. They want you to succeed and they want to cheer you on. The first step is to put yourself out there and give them a chance to encourage you.

9) If you could take any type of class, what would it be about?
French? Then I wouldn’t look like such an idiot when my husband puts me on the spot.

10) If you could have dinner with one person, who would it be?
My husband. Boring, I know, but very true.

11) If you could change anything about yourself, what would it be?
I know I’m supposed to say something like… “I’d be more charitable.” or “I’d love myself more,” but the truth is that I’d lose 30 pounds. Yeah, I’m kinda vain. Oh.. maybe I’d be less vain?

OK so now, a little housekeepingto keep the game moving.

RULES:

  • You must post the rules (CHECK!)
  • Answer the 11 questions that the tagger posted for you
  • Tag 11 people and link them in your post
  • Create 11 questions to ask the people you’ve tagged
  • Let them know you have tagged them

11 BLOGS TO TAG:
Carrie at Hazardous Designs
Aubrey at All Things Bright and Beautiful
J at Design OCD
Jenny at Evolution of Style
Janel at Hating Martha
Shanna at Swoon & Style Home
Erin at His & Hers
Jenn at My Fabuless Life
Brittany at The Coleman Chronicles
Anna at Directions Not Included
Bec at Little Lucy Lu

My 11 QUESTIONS FOR YOU:
1) What is one thing you can’t live without?
2) What’s the most unusual thing you’ve ever eaten?
3) Name one thing on your bucket list.
4) What is in your purse right now?
5) Is there a 2012 resolution that you’ve already broken? What was it?
6) What is one thing everyone should know about you?
7) What is one of your pet peeves?
8) How long does it take you to get ready in the morning?
9) What is your dream vacation?
10) If you had three wishes, what would you wish for?
11) What is the greatest gift you’ve ever been given?

I can’t wait to see everyone’s answers!

Easy Burlap Wreath

HAPPY FRIDAY!
DSCF2799
So I’ve been seriously drooling over some of the cool burlap wreaths all over the blogs for about 6 months. Seriously, I think I have about 6 different ones pinned to my boards. I’ve really been wanting to make one, but a lot of them involve a lot of cutting. I wasn’t sure how it would hold up since burlap frays so much. Or I was being a chicken. Let’s go with the freying thing, ok?
Well, on Tuesday, I found this burlap wreath through Pinterest. Laura from Top This Top That made one with no cutting!
Here’s her version:
IMG_2025
I immediately went to Michaels for my supplies and started on it. Here’s what you need:
DSCF2778

18” Wire wreath form – $3
Burlap Garland – $3ea (with 40% off coupon) x 3= $9
Floral wire – $1.99
Fake Flowers. – $1.50 I ended up using ones different from the picture.

Laura used 1 roll of Burlap Garland, but I made mine a little tighter and fuller. I used 2 1/2 rolls.

DSCF2780
1. I threaded the floral wire through the burlap and attached it to the wire frame. That keeps the first piece steady so that you’re not pulling it out.

DSCF2781
2. Start pulling loops through each of the rungs of the wreath.

DSCF2782
3. Be sure to vary the order of your loops the direction and the size. That gives it a more “ruffled” appearance. You can also twist and tuck them at the end. That’s one of the benefits of burlap. It has a very wiry texture that kind of stays where you put it.

DSCF2783
4. This is after the first roll of burlap. I used the floral wire to attach the end the same way I started it so that it wouldn’t unruffle itself. I know unruffle isn’t a word, but you know what I mean.

DSCF2784
5. I think it’s pretty as is or you can add embellishments.

I love Laura’s version with flowers, a moss bunny and the nest with eggs:

IMG_2025
I added some white flowers and a simple white ribbon.

DSCF2796
I love it! Plus, I can easily change it up with the seasons. if you made one, I’d love to see the variations on it!

DSCF2794


You need to check this out too source: Btrendie.com


woman steam cleaning a dress shirt

woman steaming a shirt source: Btrendie

Color My World: Decor

It’s week 2 in the Color My World challenge (see more about that HERE)!
Color My World 2
AND it’s the first week for a project. This week’s theme is décor and it could be purchased or made. Well, I had two of these lamps in the last house and they never really did it for me.

DSCF0753
Sorry for the crazy grainy picture, but I’m sure you get the gist of why these weren’t my favorite. I lived with them for a while, but I wouldn’t have been to upset if they’d fallen off the truck during the move.

Alas, they made it, so I need to figure out what to do with them instead of cramming them into the attic from here until eternity.

Those lamps paired with this lampshade…
DSCF2823
equals extra boring. I think I just nodded off thinking about it.

They needed a little **pep** and what better color to give them pep than my challenge color of YELLOW? Plus, I’m a big believer that there’s nothing that a little spray paint can’t fix. Even crazy boring lamps.

I did a primer coat, two coats of yellow spray paint and a coat of clear gloss lacquer on the lamps. Definitely BETTER, but still on the boring side.

I ran to Michaels and got 2 rolls of 1/2 in ribbon and 1 roll of 1/4 in ribbon… both in a pretty spring green.
Using hot glue, I adhered the ribbon to the top and bottom of the lampshade.
TIPS:

  • Use the tip of the glue gun to smooth out the bead of glue so that your ribbon lies flat.
  • Do small sections at a time so that the glue doesn’t dry to fast. I would do about 3-5 inches of glue, smooth it out and then place the ribbon.

Next, I measured 1/2 in above the bottom ribbon and made marks on the lampshade all the way around to prevent myself from getting to catawampus. I don’t have a great eye for straight lines.
Using the same technique as before, I glued the smaller ribbon around the lampshade.
DSCF2830

DSCF2930
There you have it! From boring to **bright and fun** in under 30 minutes and very little money:
Cost:
*$3 for spray paint
*$3 for lacquer
*$4 for ribbon
**$10 for two lamps Smile
Total TIME: about 25 minutes.


Next Tuesday, I’ll be doing a project around paint! Not sure what it is yet, so I guess I should get on that…

Color My World: Paint

Hope you all had a great weekend! Sorry for my absence over the past few days. I took a long weekend from blogging. I haven’t even read any blogs since Friday and I’m starting to go through withdrawl. My BlogLovin’ account is showing 106 new posts! That’s kinda overwhelming.

It’s week 3 of the Color My World Challenge and this week’s focus is Paint! If you’d like to catch up on the first two weeks of the challenge, click HERE and HERE.Color My World 2
If we were being graded on this challenge, I think I’d get a C. But it’s not for lack of trying! This week’s project was just one of those projects that refused to come together. I am finally on the right path, but not in time to get the project completed.

DSCF2969
I’ll give a full tutorial later this week on this, but for now… this is how NOT to stripe your curtains:

  • Do NOT use craft paint by itself. I started with Martha Stewart craft paint, but it left the material VERY stiff (see the bottom of the left curtain).
  • Do NOT expect to get by with 4 bottles of craft paint. The total is closer to 15. The material drinks the paint.
  • Do NOT drive all over creation hitting every Michaels in a 30 mile radius to end up with only 4 extra bottles.
  • Do NOT order 10 bottles online unless you’re really committed to this method.
  • Do NOT order 10 bottles online from a company that will not cancel orders.

Now some tips on what to do:

  • Use spray paint.

Yep, that’s right. I spray painted the curtains. it was easier, faster, cheaper and better. The curtain is not nearly as stiff and hangs much more naturally.

For the curtain on the left, I applied 2 coats of craft paint, let it dry for 2 hours in between, hated the color, and then spray painted on top. The curtain on the left is spray painted.

DSCF2969
Unfortunately, by the time I figured out that spray paint was the best option, I didn’t have time to finish the other window.

DSCF2964
But I need your help. I can’t figure out how exactly to hang the curtains on this wall.
Option A: Curtains on both sides of the window. The one on the left will behind the bed and I’ll have to move the picture.
Option b: Curtain only on the right side of the window. No curtain behind the bed.
Option c: Rearrange furniture so that the bed is on this wall.

DSCF2967
I usually like for the bed to be the focal point of a bedroom. If I rearranged the furniture that would probably not be the case.

Our deck’s pool painted by a pool service company, you can see them here PlanoPoolPros.com. Keep your feet cool & your pool deck protected with their top rated coatings.

Help! What do you think?

Next Tuesday is the final project week and we’ll be using fabric. I ordered mine last night and I’m freaking out that it wont come in on time!

How to Make a Jewelry Frame

Jewelry Frame

Last week, I was visiting one of my favorite blogs, Bower Power, and I saw the information about their Pinterest Challenge!

The purpose is to get us to stop just pinning everything and actually make something that we’ve pinned. It’s being hosted by four fabulous bloggers: Bower Power, Young House Love, Ana-White and House of Earnest. I immediately knew what I wanted to make. My best friend told me about a jewelry frame that she’d seen on pinterest that she was making a couple of weeks ago. So I went to look it up and this is what I found:

Jewelry Frame
It was on Apartment Therapy’s blog and it’s awesome. Unfortunately, I don’t have a walk in closet or an entire wall to devote to Jewelry. I decided on a smaller version of it, but it definitely solved a problem. This is what my jewelry box looked like yesterday:

Jewelry Frame
Embarrassing, right? Ever since the move, I haven’t been able to find a place to set up my earring trees which is where they hung before. So they’ve stayed in my jewelry box and every morning I try to (1) find a matching pair, which is difficult and (2) untangle them from the bracelets, other earrings and chains that they are wound around. Super fun.
TUTORIAL
Here’s what you need:
Picture Frame (Hobby Lobby, $11)
1/2 yd. Burlap (Hobby Lobby, $3.99/yd)
Staple Gun
Fray Check
Fabric ChalkElmer’s Craft Spray Glue

Jewelry Frame
1. I found the picture frame on clearance at Hobby Lobby. It was black and gold, I spray painted it, distressed it a little and pulled the back off.

Jewelry Frame
2. Use the chalk to outline the burlap to fit the frame. Cut it out.

3. Go outside and do a coat of the spray glue on to the frame. Let it dry for 1 minute before applying the burlap.

4. Starting on one end, stick the burlap to the frame. Pull it as tight as you can get it so that when you put the jewelry on, it doesn’t sag. When you get to the frame hangers, cut the burlap around them before securing them down:

Jewelry Frame

Jewelry Frame5. When you pull the burlap tight, it will make it bigger than you need it and hang off the edges of the frame. Cut off the excess.

6. Apply “Fray Chek” to the edges of the burlap to stop the fraying.

Jewelry Frame
7. Staple lots around the edges of the frame and burlap. I did two rows of staples spaced about 1-2 in. apart.

8. Hang and enjoy!

Here’s the finished product:

Jewelry Frame

Yes, I know I have too many earrings. Total Cost: $14

This is the best part… my jewelry box now looks like this:

Jewelry Frame
So much better!

Krylon vs. Rustoleum: Spray Paint Comparison

It’s official. After spray painting my curtains (tutorial coming Friday!), I will spray paint ANYTHING. My Mom has joked that if it doesn’t move, then I’ll paint it. I just proved her right.

Let’s review. The first time I ever spray painted anything was last summer after we bought the new house. Since then some of my more interesting projects involving spray paint have been:

  • 2 Chairs:

Spray Paint Comparison

  • A bed:
  • Toilet Paper Roll Art:

Toilet Paper Roll Art

  • A Chandelier:

Spray Paint Comparison

  • Lamps
  • Wreaths:
  • Closet Doors:

Spray Paint Comparison

  • Curtains:

Spray Paint Comparison
Yeah… so at this point, I’m honestly surprised that there hasn’t been an intervention.

PUT THE SPRAY PAINT DOWN.
Not gonna happen.
But I have learned something in all this spray painting madness. Some people are Team Rustoleum and some people are Team Krylon. I haven’t met very many in the Valspar camp, but there are some benefits there as well.

I’m somewhere in between and have a tendency to choose based on the project. I prefer each brand for different projects.

Spray Paint Comparison
Rustoleum PROS:
  • Very even spray through the end of the bottle
  • I think one bottle covers more than other brands.
  • The metallics line can’t be beat. This stuff sprays even and looks very real
    Spray Paint Comparison

Rustoleum CONS:

  • I’ve noticed that some of their colors aren’t true from can to can. I’ve used “Antique White” on about 4 different projects and they all look slightly different to me. Some seem to be whiter and some seem to be more yellow/cream colored.
  • Price very high for the metallics line but more reasonable for the regular lines

Krylon pros:

  • Price per can is about $3.67 at Walmart.
  • BEST THING EVER: EZ Touch 360 sprays. The nozzle is adjustable to spray whatever direction you want. It’s more accurate and wastes less paint
Vertical
Spray Paint Comparison
Horizontal
Spray Paint Comparison
Any Angle
Spray Paint Comparison
  • Paint & Primer spray is great and much less expensive than Rustoleum
  • It specifically mentions that it’s safe for fabric. Krylon is the only one that makes this claim.
  • Huge variety of craft line paints, including glitter, mirrored finish, textures and finishes.

Krylon CONS:

  • Spray gets very erratic towards the end of the can. I have to constantly shake it to get it to spray.
  • Paint seems slightly more liquid than Rustoleum, which leads to more drips.

Valspar PROS:
DISCLAIMER: I don’t know much about Valspar spray paints. They are relatively new and I have only used it a couple of times.

  • Matches some of their Latex paint, so that you can coordinate. You’ll see a
  • little sign indicating that the color is available in the spray paints as well.
  • Quick dry formula. Second coats can be applied in 20 minutes.
  • Can designed to be easier to spray.

valspar CONS:

  • Smaller color selection

So there you have it. Do you have a favorite brand of spray paint?

Lazy Girl’s Guide to Refinishing Wood

I hope yall had a great weekend!

I was able to make some progress in the Guest Room this weekend. We painted the ceiling, walls and trim. There’s a very good chance that I killed thousands of brain cells with all those paint fumes. Here’s how the room looks now:

Easily Refinish Wood
The paint color is Valspar’s Stormy Cove. As it was going on, I really thought I was going to hate it. But I love it.  It’s like a grown up blue versus a little boy blue. It looks super dark in the picture above but it’s a good bit lighter than that. You can see a more accurate idea of the color in the pictures below.

Plus, yesterday I spent some time refinishing the bed and dresser in that room. Most of the furniture going in this room is from my room growing up. However, all those years have left the bed looking less than brand new:
Easily Refinish Wood
Beautiful, right?
I did NOT want to refinish this whole thing, so I did the next best thing:
Lazy Girl’s Guide to Wood Refinishing
Easily Refinish Wood
You’ll need:

  • super fine steel wool (grade 000 or 0000)
  • Howard Restor-A-Finish
  • Howard Feed-n-Wax
  • Latex gloves
  • 2 old rags
  • paper towels

1. Give the entire surface a good cleaning with the steel wool. This will not scratch the wood. It just cleans off grime and barely scuffs the surface.
2. Using gloves and an old rag, pour some of the Restor-a-Finish on the rag.
Easily Refinish Wood
3. Rub it generously into the wood with the grain. Make sure to get into any ridges, scratches and details.
4. Let sit for at least 30 minutes. Then use a paper towel to wipe off any excess. Your wood should already look a million times better.
5. Onto the other old towel, generously squirt out the Feed-n-Wax (what a weird name, right?). This stuff smells amazing because it has Orange Oil in it. Rub it into the wood with the grain.
6. Let sit for at least 30 minutes and then rub off excess with a paper towel.
Before:
Easily Refinish Wood
After:
Easily Refinish Wood
Before:
Easily Refinish Wood
After:
Easily Refinish Wood
Crazy difference, right?

Did you get projects done this weekend or did you enjoy the beautiful spring weather?

Page 4 of 7